
If you’re asking yourself, “How do I fix a leaking hummingbird feeder?”, don’t worry – it’s not as complicated as it may seem. The first step is to identify the source of the leak, then clean and check for any damage. Next, replace any damaged parts, check the connections, and test your feeder.
In this blog post, we’ll walk you through these steps in detail to help you get your hummingbird feeder back in tip-top shape.
- Identifying the Leak – Fixing a Leaking Hummingbird Feeder
- Cleaning and Checking for Damage
- Replacing Any Damaged Parts
- Checking Connections
- Testing Your Feeder
- Q: How can I identify the source of the leak in my hummingbird feeder?
- Q: What should I do if I can't find any visible leaks in my hummingbird feeder?
- Q: How do I clean and inspect my hummingbird feeder for damage?
- Q: How do I find the right replacement parts for my hummingbird feeder?
- Q: What should I do if my hummingbird feeder is still leaking after replacing damaged parts?
- Q: How can I test my hummingbird feeder for leaks after repairing it?
- Q: How often should I clean my hummingbird feeder?
- Q: Can I use any type of soap to clean my hummingbird feeder?
- Q: Is it possible to repair a cracked reservoir in a hummingbird feeder?
- Q: What can I do to prevent leaks in my hummingbird feeder in the future?
To fix a leaking Hummingbird Feeder, here are 5 steps to consider:
- Identify the Leak
- Clean and Check for Damage
- Replace Any Damaged Parts
- Check Connections
- Test Your Feeder.
Let’s delve into this in more detail and follow the process step-by-step.
Identifying the Leak – Fixing a Leaking Hummingbird Feeder
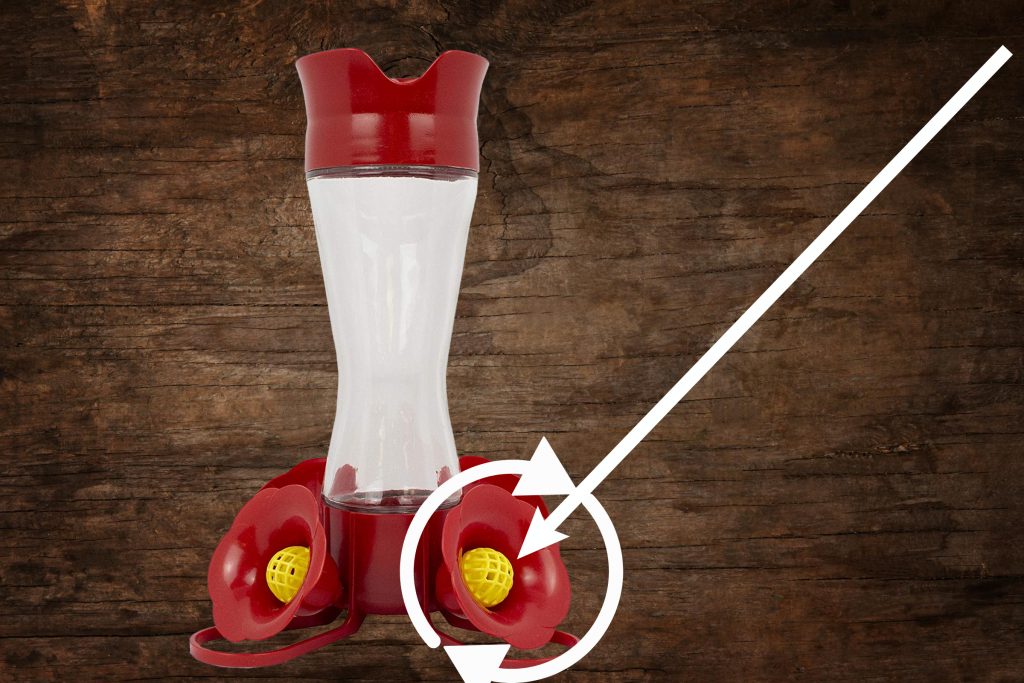
- Examine the feeder carefully: To fix a leaking hummingbird feeder, start by identifying the source of the leak. Look for any cracks, loose connections, or damaged parts. Hummingbird feeders can leak from various places, such as the reservoir, base, or feeding ports.
- Observe while in use: Sometimes, it’s easier to spot the leak when the feeder is in use. Fill the feeder with nectar and hang it up, then watch for any drips or seepage.
- Check the seal: If you can’t find any visible leaks, the problem may be with the seal between the reservoir and the base. In this case, inspect the seal for any signs of wear or damage, and ensure it is fitted properly.
Cleaning and Checking for Damage
- Disassemble the feeder: To fix a leaking hummingbird feeder, you’ll need to clean and inspect all parts. Begin by disassembling the feeder according to the manufacturer’s instructions.
- Clean each part thoroughly: Wash each component of the feeder with warm, soapy water. Be sure to scrub away any residue, mould, or dirt that could be causing the leak.
- Inspect for damage: While cleaning, check each part for any signs of damage, such as cracks, chips, or splits. Pay particular attention to the reservoir, base, and feeding ports, as these are the most likely places for leaks to occur.
Replacing Any Damaged Parts
- Identify replacement parts: If you find any damaged parts while cleaning and inspecting your feeder, you’ll need to replace them. Consult the manufacturer’s website or customer service to find the correct replacement parts for your specific feeder model.
- Order and replace: Once you have the correct parts, follow the manufacturer’s instructions to replace the damaged components. Ensure that all parts are installed correctly and securely to prevent any future leaks.
Checking Connections
- Tighten and secure: After replacing any damaged parts, double-check all connections to ensure they are tight and secure. Loose connections can lead to leaks, so it’s important to fix any issues in this area.
- Check the seal: Reinspect the seal between the reservoir and base, making sure it is properly positioned and undamaged. If the seal appears worn or damaged, consider replacing it to prevent further leaks.
- Reassemble the feeder: Once you have checked all connections and replaced any damaged parts, reassemble the hummingbird feeder according to the manufacturer’s instructions.
Also, ensure there aren’t any gaps between parts, as this could also attract pests like ants or bees, which may try to get into your nectar supply.
Testing Your Feeder
- Fill with nectar: To test your hummingbird feeder for leaks, fill it with nectar and hang it up as you normally would.
- Observe for leaks: Keep an eye on the feeder for any signs of leakage. If you notice any drips or seepage, retrace your steps and identify the source of the problem.
- Adjust as needed: If you find any issues during your test, make any necessary adjustments, such as tightening connections or repositioning the seal. Repeat the testing process until your feeder is leak-free.
Conclusion
Fixing a leaking hummingbird feeder may seem daunting at first, but with a little patience and attention to detail, you can quickly and easily resolve the issue. By following the steps outlined in this post – identifying the leak, cleaning and checking for damage, replacing any damaged parts, checking connections, and testing your feeder – you’ll be well on your way to enjoying a leak-free hummingbird feeder once again.
Remember, a well-maintained feeder not only provides nourishment for your beautiful feathered friends but also brings joy and wonder to your garden. So, take the time to fix that pesky leak, and soon you’ll be back to observing the mesmerising world of hummingbirds right in your own backyard.
FAQs – How To Fix Leaking Hummingbird Feeder
Q: How can I identify the source of the leak in my hummingbird feeder?
A: To identify the source of the leak, carefully examine the feeder for any cracks, loose connections, or damaged parts. You can also fill the feeder with nectar, hang it up, and observe it in use to spot any drips or seepage.
Q: What should I do if I can’t find any visible leaks in my hummingbird feeder?
A: If you can’t find any visible leaks, the problem may be with the seal between the reservoir and base. Inspect the seal for any signs of wear or damage, and ensure it is fitted properly.
Q: How do I clean and inspect my hummingbird feeder for damage?
A: Disassemble the feeder according to the manufacturer’s instructions, then wash each component with warm, soapy water. While cleaning, inspect each part for signs of damage, such as cracks, chips, or splits.
Q: How do I find the right replacement parts for my hummingbird feeder?
A: Consult the manufacturer’s website or customer service to find the correct replacement parts for your specific feeder model.
Q: What should I do if my hummingbird feeder is still leaking after replacing damaged parts?
A: Double-check all connections to ensure they are tight and secure, and reinspect the seal between the reservoir and base. If necessary, make adjustments such as tightening connections or repositioning the seal.
Q: How can I test my hummingbird feeder for leaks after repairing it?
A: Fill the feeder with nectar, hang it up, and observe it for any signs of leakage. If you notice any issues, retrace your steps and identify the source of the problem.
Q: How often should I clean my hummingbird feeder?
A: It’s recommended to clean your hummingbird feeder at least once every one to two weeks to prevent mould growth and keep it in good working condition.
Q: Can I use any type of soap to clean my hummingbird feeder?
A: Use a mild, unscented dish soap to clean your feeder, as strong chemicals or scented soaps can be harmful to hummingbirds.
Q: Is it possible to repair a cracked reservoir in a hummingbird feeder?
A: If the crack is small, you may be able to repair it using a waterproof, food-safe adhesive. However, if the crack is large or compromises the integrity of the feeder, it’s best to replace the reservoir entirely.
Q: What can I do to prevent leaks in my hummingbird feeder in the future?
A: To prevent future leaks, regularly clean and inspect your feeder for damage, ensure all connections are tight and secure, and replace worn or damaged parts as needed. Proper maintenance will help keep your feeder leak-free and in good working condition.
Video – How To Fix Leaking Hummingbird Feeder
Related Posts: