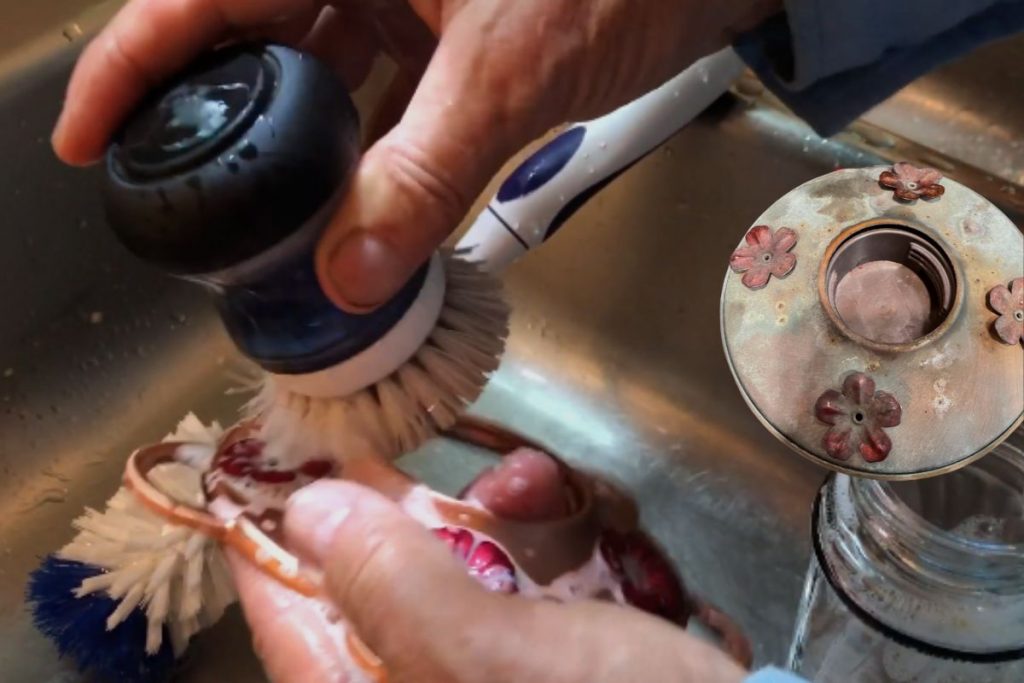
To clean rust off a hummingbird feeder, first, scrub the rusty areas with a mixture of dish soap and warm water. If the rust remains, make a paste with baking soda and water, apply it to the rust, and let it sit for 30 minutes before scrubbing again.
For stubborn rust, try soaking the feeder in a mixture of white vinegar and water for a few hours, then rinse and scrub it clean.
In this step-by-step guide, we’ll walk you through the process step-by-step, explaining how each step helps to eliminate rust and keep your feeder in tip-top shape for your feathered friends.
We’ll also discuss how to prevent rust from forming in the first place, ensuring that your hummingbirds always have a clean and safe place to feed. So, let’s dive right in!
Before we get into the rust removal process, it’s essential to understand why rust forms on hummingbird feeders.
Related Posts:
Best Hummingbird Feeders.
Hummingbird Feeders Comprehensive Guide.

Why Rust Forms on Hummingbird Feeders
Rust formation on hummingbird feeders is a common issue, particularly for feeders made from metal or containing metal components. The primary cause of rust is a chemical reaction between iron or iron-containing alloys (such as steel) and moisture in the presence of oxygen. When these elements come together, they create iron oxide, which we know as rust.
Several factors contribute to rust formation on hummingbird feeders:
- Outdoor exposure: Since hummingbird feeders are typically placed outdoors, they are constantly exposed to the elements, such as rain, humidity, and temperature fluctuations. This exposure to moisture can facilitate rust formation on any metal parts of the feeder.
- Material choice: As mentioned earlier, feeders made from metal or with metal components are more susceptible to rust. This includes materials such as iron, steel, and some metal alloys. Rust-resistant materials like stainless steel, glass, or plastic are better choices for preventing rust formation.
- Quality of materials and construction: Lower-quality materials or poorly constructed feeders are more prone to rust as they may not be adequately sealed or protected against moisture.
- Inadequate maintenance: Neglecting to clean and maintain your hummingbird feeder regularly can lead to the accumulation of moisture and debris, which can contribute to rust formation.
Understanding why rust forms on hummingbird feeders is crucial to taking preventative measures and ensuring that your feeder remains in good condition, providing a safe and clean environment for your visiting hummingbirds.
Gathering Your Rust Removal Supplies
To effectively remove rust from your hummingbird feeder, you’ll need the following supplies:
- White vinegar
- Baking soda
- A non-abrasive scrubbing pad or an old toothbrush
- Rubber gloves (optional)
- Clean, dry cloth or paper towels.
These supplies are all readily available and can be found in most households. Vinegar and baking soda are natural, non-toxic substances that are excellent at breaking down rust and other types of grime. The scrubbing pad or toothbrush will help you remove stubborn rust spots without scratching the surface of your feeder.

A Step-by-Step Guide to Removing Rust
Follow these steps to remove rust from your hummingbird feeder:
Step 1: Empty and disassemble the feeder
First, empty the feeder and take it apart as much as possible. This will make it easier to clean and reach all the rusted areas.
Step 2: Create a vinegar and baking soda paste
Mix equal parts white vinegar and baking soda in a small container until you have a thick, spreadable paste.
Step 3: Apply the paste to rusted areas
Using a cloth or your fingers (with gloves, if preferred), apply the vinegar and baking soda paste to the rusted areas of your feeder. Let the paste sit for 15-20 minutes to give it time to break down the rust.
Step 4: Scrub the rusted areas
Using your non-abrasive scrubbing pad or toothbrush, gently scrub the rusted areas in a circular motion. Be sure to apply gentle pressure to avoid scratching the feeder’s surface.
Step 5: Rinse and dry
Once the rust has been removed, rinse the feeder thoroughly with clean water. Then, use a clean, dry cloth or paper towels to dry the feeder completely before reassembling and refilling it.

Preventing Rust from Forming
While it’s essential to know how to remove rust from hummingbird feeders, it’s even better to prevent it from forming in the first place. Here are some tips to keep your feeder rust-free:
- Choose a feeder made from rust-resistant materials, such as stainless steel, glass, or plastic.
- Ensure that your feeder is properly sealed to prevent moisture from getting in.
- Regularly inspect your feeder for signs of wear or damage, as these can make it more susceptible to rust formation. Repair or replace any damaged parts as needed.
- Keep the feeder clean and dry. After refilling it, make sure to wipe away any spilt nectar to reduce the chances of rust forming.
- Position your feeder in a sheltered location, away from direct rainfall and excessive moisture.
In addition to the points discussed above, applying some protective coating to the rusted areas of your bird feeder might help. However, if you’re looking to apply a protective coating to your bird feeder, you should consider using a non-toxic, bird-safe sealant or non-toxic paint instead.
These products are specifically designed for use on outdoor items like bird feeders and houses, and they take into account the safety and well-being of the birds. Generally, this will help extend your hummingbird feeder’s lifespan and keep it looking its best.
The Importance of Regular Maintenance
Regular maintenance is crucial for keeping your hummingbird feeder in top condition and preventing rust from forming. Here are some essential maintenance tasks to perform:
- Clean your feeder every 3-5 days or more frequently in hot weather to prevent mould and bacteria growth. Use a mild soap and warm water solution, then rinse thoroughly before refilling.
- Check for any signs of rust regularly. If you spot any, follow the rust removal steps outlined earlier in this blog post.
- Keep an eye on the feeder’s hardware, such as hooks, chains, or hanging brackets. Replace them as needed if they show signs of rust or wear.
By staying on top of your feeder’s maintenance, you can significantly reduce the likelihood of rust forming and help ensure that your hummingbirds always have a clean and safe place to feed.
Final Thoughts: Keep Your Feeder Rust-Free for Happier Hummingbirds
In conclusion, knowing how to remove rust from your hummingbird feeder is essential to keep it in good condition and provide a safe feeding environment for your feathered friends. By following the step-by-step guide above and using natural, non-toxic ingredients like vinegar and baking soda, you can effectively eliminate rust and keep your feeder looking its best.
Also, focusing on preventative measures and regular maintenance can significantly reduce the chances of rust forming in the first place. By choosing rust-resistant materials, keeping the feeder clean and dry, and inspecting it regularly for signs of wear or damage, you can help prolong the life of your feeder and provide a welcoming space for hummingbirds to visit.
Ultimately, a rust-free feeder contributes to happier, healthier hummingbirds that will continue to grace your garden with their beauty and charm. So, let’s commit to giving these tiny creatures the clean, safe environment they deserve by staying vigilant in our feeder maintenance and rust prevention efforts.
FAQs – How To Remove Rust From Hummingbird Feeder
Q: How often should I clean my hummingbird feeder?
A: You should clean your hummingbird feeder every 3-5 days or more frequently in hot weather to prevent mould and bacteria growth.
Q: What cleaning solution should I use to clean my hummingbird feeder?
A: You can use a mild solution of unscented dish soap and warm water to clean your feeder. For more stubborn grime, a mixture of white vinegar and baking soda can also be used as an all-natural product.
Q: How do I clean hard-to-reach places inside the feeder?
A: Use a bottle brush or a specialized bird feeder cleaning brush to clean hard-to-reach places in your feeder, such as the feeding reservoirs and feeding ports.
Q: How do I clean the feeding ports and bee guards on my hummingbird feeder?
A: Use a small cleaning tool, such as a toothbrush or a pipe cleaner, to gently scrub the feeding ports and bee guards, ensuring they are free of debris and build-up.
Q: How can I remove black spots or mould from my feeder?
A: Use a mixture of white vinegar and baking soda or a mild bleach solution (1 part bleach to 9 parts water) to clean any black spots or mould growth from your feeder. Rinse thoroughly with clean water before refilling.
Q: What should I do if I notice a metallic smell coming from my metal feeder?
A: If your metal feeder emits a metallic smell, it could be a sign of rust or other corrosion. Follow the rust removal steps provided above to clean and restore your feeder.
Q: How do I keep the nectar fresh in my hummingbird feeder?
A: To keep nectar fresh, clean and refill your feeder regularly, maintain a 4:1 ratio of water to sugar for the nectar, and avoid placing the feeder in direct sunlight, which can cause the nectar to spoil more quickly.
Q: How much nectar should I put in my hummingbird feeder?
A: The amount of nectar needed depends on the size of your feeder. Most feeders hold between 8 and 32 ounces of nectar. Fill your feeder to a level that allows for regular cleaning and refilling without wasting nectar.
Q: What are the benefits of using a plastic feeder over a metal feeder?
A: Plastic feeders are generally less prone to rust and corrosion, making them a low-maintenance option. They are also typically lighter and easier to clean than metal feeders.
Q: Can I use hot water to clean my hummingbird feeder?
A: Yes, you can use hot water to clean your feeder, especially when mixed with unscented dish soap. However, ensure that you rinse the feeder thoroughly with cold water before refilling it with nectar.
Q: How do I clean a bottle-style hummingbird feeder?
A: To clean a bottle-style feeder, disassemble the feeder, then use a bottle brush and a mild soap solution to clean the inside of the bottle. Rinse thoroughly and clean the feeding ports and other components before reassembling.
Q: How do I clean a dish-style hummingbird feeder?
A: Dish feeders can be cleaned using a sponge or cloth with a mild soap solution. Scrub the dish, feeding ports, and other components, then rinse thoroughly with clean water.
Q: What is the best way to clean a feeding flower on a hummingbird feeder?
A: Gently scrub the feeding flower with a toothbrush or small brush and a mild soap solution. Rinse well with clean water before reassembling the feeder.
Q: Why is the water in my hummingbird feeder cloudy?
A: Cloudy water could indicate bacterial growth or spoiled nectar. Empty the feeder, clean it thoroughly and refill it with fresh nectar to ensure the health and safety of your visiting hummingbirds.
Q: How do I keep my feeder clean during cooler weather?
A: During cooler weather, continue to clean your feeder every 3-5 days, as mould and bacteria can still grow. Pay attention to the nectar’s consistency and colour to ensure it remains fresh.
Q: How do I dry my hummingbird feeder after cleaning?
A: After cleaning, rinse the feeder thoroughly and use a clean paper towel to wipe down the feeder’s exterior. Allow the feeder to air dry completely before refilling it with nectar.
Q: Can I use plain water to clean my hummingbird feeder?
A: While plain water can be used for a quick rinse, it is recommended to use a mild soap solution or a mixture of white vinegar and baking soda for a more thorough cleaning.
Q: How do I keep my hummingbird feeder clean during busy feeder times?
A: During busy feeder times, keep an eye on the nectar levels and cleanliness of the feeder. Clean and refill the feeder more frequently to ensure a clean feeding station for your visiting hummingbirds.
Q: How do I create a hummingbird-friendly habitat in my garden?
A: Plant a variety of nectar-rich flowers, such as bee balm, trumpet vine, and fuchsia. Provide a clean and safe hummingbird feeder and a source of fresh water for the birds to drink and bathe in.
Q: Why is it important to clean my hummingbird feeder regularly?
A: Regular cleaning prevents the growth of mould and bacteria, which can be harmful to hummingbirds. A clean feeder also ensures that your visiting hummingbirds have a safe and healthy place to feed.

Rust inside the feeder has constant contact with water will a protective coating of rustolium hurt the birds ?
Hello Catharibe,
Using a protective coating like Rust-Oleum might seem like a good idea, but it’s important to consider the safety of the birds first. Some Rust-Oleum products contain chemicals that could be harmful to birds if ingested. Therefore, I would not recommend using Rust-Oleum or similar products on surfaces that will come into direct contact with the birds or their food and water.
Instead, you could try some bird-safe alternatives for dealing with rust in the feeder. For example, you might consider replacing the rusty parts with stainless steel or plastic components that are resistant to rust. Another option would be to clean the rusty areas with a mixture of white vinegar and water, then thoroughly rinse and dry the feeder before putting it back into use. Regular cleaning and maintenance can also help prevent rust from developing in the future.
Also, if you’re still considering protective coating, I’ll suggest you consider using a non-toxic, bird-safe sealant or non-toxic paint instead.
I hope this helps, Catharibe. Please feel free to reach out if you have any more questions or concerns.
Thanks, and happy birdwatching!